Recommended products
-
Anbernic RG DS
Price range: £144.90 through £164.90 -
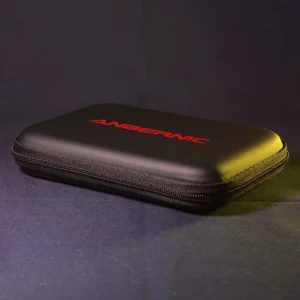
Anbernic RG DS Official Protective Case
£15.90
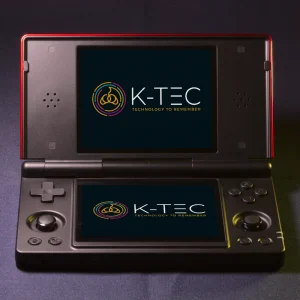
This guide is written for the K-TEC edition of the Anbernic RG DS — a dual-screen clamshell handheld running GammaOS Next (Android 14), expertly configured with 39 gaming platforms ready to play.
If you bought your RG DS from K-TEC, everything in this guide applies to your device. Your handheld has been personally configured, tested, and optimized — every platform verified, every control mapped, every display setting refined.
If you installed GammaOS Next yourself, much of this guide will still be useful (especially the hotkeys, dual-screen section, and troubleshooting). However, the K-TEC-specific features — per-game keyboard mappings, pre-configured arcade controls, display optimisations, and the full 39-platform library — are exclusive to devices bought from K-TEC.
Getting Started
Your RG DS uses a single MicroSD card for games
Unlike some handhelds, your RG DS stores the operating system (GammaOS Next) on its internal 32 GB storage. Your games live on a separate Kioxia (Toshiba) MicroSD card — 64 GB or 128 GB, depending on which version you chose. This card is covered by my Lifetime SD Card Guarantee.
The MicroSD slot is on the hinge edge of the device, near the L1/L2 shoulder buttons. If you bought from K-TEC, the card is already inserted and ready to go.
First boot
- Open the clamshell.
- Press and hold the Power button (right side of the device, next to the volume buttons) for 2–3 seconds until the screen lights up.
- The device takes approximately one minute to boot.
- You will see the platform selection screen on the bottom display — a gallery showing one gaming platform at a time with its name, game count, and a background image.
- Swipe left or right (or press L2 / R2) to browse platforms. Press A or tap to open a platform’s game list.
Charging
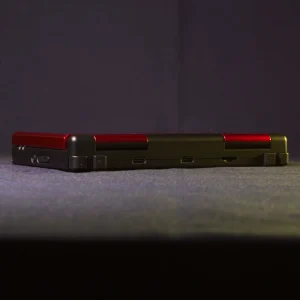
Plug a USB-A to USB-C cable into the charging port on the hinge edge of the device (near the R1/R2 shoulder buttons). The other USB-C port (in the middle of the hinge edge) is an OTG port for accessories — it will not charge the device. A full charge provides up to 6 hours of gameplay, even more if you use power-saving mode.
Warning: When charging, always use a standard 5V/1A or 5V/2A charger (USB-A to USB-C). Do not use high-speed USB-C to USB-C fast chargers (like those for MacBooks or modern phones), as they may damage the battery regulation circuit.
Your Dual-Screen Display
The RG DS has two 4.0-inch IPS displays, and understanding how they work together is the key to getting the most from the device.
Screen focus
The hardware buttons control whichever screen you touched last — that screen has the current focus. The exception is when you launch a game: focus automatically moves to the top screen and stays there until you touch the bottom screen.
This takes a little getting used to, but it quickly becomes second nature.
Nintendo DS games
NDS games use both screens simultaneously, just like the original Nintendo DS hardware. The top screen displays the game’s upper display, and the bottom screen shows the game’s lower display — complete with touch support.
The NDS emulator (DraStic) is automatically configured to span both displays. No setup required. Open a game and both screens light up.
- Swap screens: Press L2 to swap which DS screen appears on top and which appears on the bottom.
- Touch: The screens support touch input — use your finger or the stylus included in the box.
- Fast-forward: Press R2 to toggle fast-forward on or off.
Every other platform
For non-NDS gaming, the top screen displays your game at full size while the bottom screen shows the Daijishou games library — complete with box art and descriptions. Pick a game from the bottom screen with touch, and it launches on the top screen.
Switching games without quitting
Because your game and the games library live on separate screens, you don’t need to quit your current game before starting a new one (NDS games excepted — hold BACK/FUNCTION to quit first). While your game runs on the top screen, use the bottom screen to navigate to your next game and simply select it. The current game automatically closes — saving your state if it’s running through a RetroArch core — and the new one starts.
Multi-tasking
Because the RG DS runs Android, you can run two apps at once. Open a web browser on the bottom screen to follow a walkthrough while your game runs on the top screen. This works well with 2D games (NES, SNES, Game Boy, etc.) but may cause performance issues with more demanding platforms (N64, Dreamcast, PSP) — use Max Performance mode when multi-tasking.
Controls & Hotkeys
The BACK/FUNCTION button
The BACK/FUNCTION button sits at the bottom left of the lower screen. It’s the most important button on the device:
- Quick press: Opens the emulator menu (RetroArch Quick Menu, or PPSSPP menu for PSP games)
- Hold: Quits the current game
Hotkeys
| Action | Hotkey |
|---|---|
| Sleep / Wake | Quick press POWER, or close/open the lid |
| Unlock screen | Swipe up from the bottom edge of the screen |
| Quit game | Hold BACK/FUNCTION |
| Emulator menu | Quick press BACK/FUNCTION |
| Save state | BACK/FUNCTION + R2 |
| Load state | BACK/FUNCTION + L2 |
| Fast-forward (hold) | BACK/FUNCTION + R1 |
| Rewind (hold) | BACK/FUNCTION + L1 |
| Screenshot | BACK/FUNCTION + Y |
| Swap NDS screens | L2 |
| NDS fast-forward (toggle) | R2 |
| Safe shutdown | Hold POWER → select Power Off on screen |
| Hard shutdown (last resort) | Hold POWER for more than 10 seconds |
Important: Save state, load state, fast-forward, rewind, and screenshot only work for games running through RetroArch. They do not work for standalone emulators (Nintendo DS, Dreamcast, N64, PSP). For those platforms, open the emulator menu (quick press BACK/FUNCTION) to access save options, or use each game’s built-in save system.
Rewind is also disabled for some RetroArch platforms for performance reasons: 3DO, Amiga, CPS III, and PS1.
Favourite a game
Tap and hold a game in the list to open its detail screen, then tap Add Favorite. Favourited games appear in a dedicated Favourites section. Tap Favorited to remove a favourite.
Search for a game
Press X to bring up the search screen.
Tuning
If you bought your RG DS from K-TEC, I have used my expert knowledge to tune the configuration of your device. Here is a summary of the changes I have made.
Firmware
I have replaced the stock software with GammaOS Next — a custom-built operating system by TheGammaSqueeze that transforms the RG DS from a promising idea into the dual-screen retro handheld it was always meant to be. Reviewers credit GammaOS Next with fundamentally changing what this device could do.
I use the Lite edition (no Google services), which reserves more of the device’s resources for gaming.
MicroSD card
The MicroSD cards typically supplied with budget handhelds are unbranded and unreliable. I ship these devices with a Kioxia (Toshiba) card — a brand-name component I trust. I am so confident about the quality that I provide a Lifetime Guarantee.
I still recommend backing up your card as soon as you receive your device. See my guide: How to back up your retro handheld’s MicroSD cards.
Per-game tuning
Some games need specific settings that differ from the defaults. If you bought from K-TEC, I have configured these individually so they work the moment you select them:
- ZX Spectrum: I have created individual controller configurations for hundreds of games — because on a stock system, most Spectrum games simply don’t respond to a gamepad. I mapped the keyboard controls for each game so you can pick up and play.
- Amstrad CPC: Similarly, I have mapped keyboard keys to the gamepad buttons for specific games so they can be played without the on-screen keyboard.
- Arcade games: I have made custom controller mappings for individual games, ensuring that trackball, spinner, and twin-stick games play correctly on a handheld gamepad.
- Vectrex: I have added authentic screen overlays for over 30 games that recreate the coloured plastic overlays shipped with the original cartridges.
- Dreamcast: I have optimized the game library for PAL (50 Hz) performance, which runs significantly better on this device’s processor.
- 3DO: I have configured per-game overrides for demanding titles.
Display
- Shaders: I have applied a Sharp Shimmerless shader across all RetroArch platforms for crisp, stable pixel rendering — no distracting shimmer or fuzziness when games scroll.
- Aspect ratio: Set to “Core Provided” — each emulator conforms to the original screen shape of the system it is emulating, preventing games from appearing squashed or stretched.
- Crop borders: Home computer platforms (Commodore 64, Amstrad CPC, ZX Spectrum) often display large coloured borders in emulation. I have configured cropping to remove these borders and fill the screen with the game.
Save states
If you bought from K-TEC, your device is configured to automatically save your progress for RetroArch platforms when you exit a game and automatically load it when you return. This means you can pick up exactly where you left off without manually saving.
Auto-save does not work for standalone emulators (Nintendo DS, Dreamcast, N64, PSP). For those platforms, open the emulator menu (quick press BACK/FUNCTION) to access save options, or use each game’s built-in save system.
Performance Modes
Swipe down from the top of the screen (twice) to access the Quick Settings panel. You will see a button to toggle Performance Modes:
- Power Saving: Ideal for 8-bit and 16-bit systems (NES, SNES, Mega Drive, Game Boy). Maximum battery life.
- Normal: The sweet spot. Good for PS1 and general use.
- Max Performance: Necessary for N64, Dreamcast, and PSP. Also recommended when multi-tasking (browsing while playing). Will drain the battery faster.
Platform-Specific Notes
Nintendo DS
NDS is the reason this device exists. The dual-screen, clamshell design, and touch support make the RG DS the ideal handheld for Nintendo DS emulation.
- Both screens are used simultaneously — no setup required.
- L2 swaps the screens.
- Touch input works on the screens with your finger or the stylus.
- R2 toggles fast-forward.
Dreamcast
Dreamcast performs well on the RG DS with one important tip: when a Dreamcast game asks you to choose between 50 Hz and 60 Hz, always choose 50 Hz. The device’s processor handles the lower frame rate significantly better, resulting in smoother gameplay.
PlayStation 1
PS1 performance is excellent on the RG DS. Auto-save states are enabled — your progress saves automatically when you exit and loads when you return.
Nintendo 64
N64 uses a standalone emulator (Mupen64Plus). Performance varies by title — some games run at full speed, others are more demanding. Use Max Performance mode for the best results.
PSP
PSP uses the PPSSPP standalone emulator. Performance is good for most titles. Quick press BACK/FUNCTION to access the PPSSPP menu.
Home Computers (ZX Spectrum, Amstrad CPC, Commodore 64, Amiga)
These were keyboard-based computers. If you bought from K-TEC, I have pre-mapped the gamepad controls for hundreds of games so you can play without a keyboard.
For games that require a one-off key press (choosing “Kempston Joystick” on the Spectrum, for example), you can bring up a virtual keyboard:
| Platform | Virtual keyboard |
|---|---|
| ZX Spectrum | Press SELECT |
| Commodore 64 | Press SELECT |
| Amiga | Press SELECT |
| Amstrad CPC | Not needed — pre-configured |
If a game asks for an input method, always select Kempston (Spectrum) or Joystick. These are pre-mapped to the D-pad and face buttons.
Game Boy
I have set the screen colour to a light green, matching the original Game Boy display. If you would like to try a different colour palette, open the RetroArch Quick Menu and look for the palette options.
Understanding Performance
Your RG DS uses the RockChip RK3568 processor. Here is what to expect from each system:
Excellent — plays at full speed
NES, SNES, Mega Drive, Master System, Game Boy, Game Boy Color, Game Boy Advance, Atari 2600, Atari 7800, Arcade, PlayStation 1, Commodore 64, Amstrad CPC, ZX Spectrum, Amiga, TurboGrafx-16, Atari Lynx, Game & Watch, Nintendo DS
Good — most games playable, some may struggle
Nintendo 64, Dreamcast, PSP, 3DO
Not capable
PlayStation 2, GameCube, Wii, Nintendo 3DS and later systems. The RG DS is not powerful enough to emulate these.
A note about partial systems: For N64, Dreamcast, PSP, and 3DO, performance varies from game to game. Some titles run beautifully, others push the processor to its limit. I have tuned the emulators to give you the best experience possible — but some games on these systems will not run at full speed. This is a limitation of the hardware, not the configuration.
Connectivity
The RG DS has more connectivity options than most retro handhelds:
- WiFi 5 — connect to your home network. Useful for browsing while you play (multi-tasking on the bottom screen), or for Daijishou to fetch cover art when adding new games.
- Bluetooth 4.2 — connect wireless headphones or Bluetooth controllers.
- USB-C — two ports on the hinge edge: one for charging, one OTG port for accessories.
- 3.5mm headphone jack — on the front-left edge of the device.
Note: There is no video out. You cannot connect the RG DS to a TV or external display.
Adding More Games
Your games are stored on the MicroSD card. If you bought from K-TEC, your card is a Kioxia (Toshiba) card with a partition called GAMES-64GB or GAMES-128GB.
To add more games:
- Hold POWER and select Power Off to safely shut down the device.
- Remove the MicroSD card from the slot on the hinge edge.
- Insert it into your computer using a MicroSD card reader.
- Open the
GAMES-64GBorGAMES-128GBpartition. - You will see folders for each system (
nds,psx,gba, etc.). Copy your game files into the appropriate folder. - Safely eject the card from your computer and reinsert it into the RG DS.
- After booting, open the platform you added games to, then:
- Tap Paths
- Tap SYNC
- Wait for the sync to complete (this can take a little while for large libraries)
The sync will also fetch cover art automatically if your device is connected to WiFi.
Windows users: If the GAMES partition does not appear, open Disk Management and assign it a drive letter. This is a one-time fix.
Mac users: Be careful that macOS does not add extra characters to filenames — this is a known cause of games not appearing.
Do not delete existing folders in the GAMES partition — some contain files that the emulators need.
Troubleshooting
The device will not turn on
- Make sure the MicroSD card is firmly inserted in the slot on the hinge edge.
- The battery may be completely flat — connect the USB-C cable to the charging port and charge for at least 30 minutes before trying again.
- If it still does not respond, hold the POWER button for more than 10 seconds and try again.
A game does not appear after adding it
- Make sure the game file is in the correct platform folder on the
GAMES-64GBorGAMES-128GBpartition. - Make sure the file extension is supported for that system (e.g.
.ndsfor Nintendo DS,.pbpfor PS1). - Mac users: check that macOS has not added extra characters to the filename.
- Run a SYNC in Daijishou (tap Paths → SYNC) to refresh the game list.
A game runs slowly
- Check the performance table above — some systems are at the upper limit of what the RG DS can handle.
- Switch to Max Performance mode (swipe down twice from the top of the screen).
- For Dreamcast games: make sure you chose 50 Hz when prompted.
I touched the bottom screen and lost control of my game
The hardware buttons control whichever screen you last touched. If you accidentally tapped the bottom screen while playing, your game is still running — just touch the top screen to return focus to it. If your game actually restarted from the beginning instead, see the next entry.
My game restarted on its own
Not a fault — and your saves are safe. This is the same dual-screen focus quirk, just with a more startling result.
While you’re playing, if your thumb brushes the bottom screen, the controls shift focus to the games library (Daijishou) living on that display. Your game is still highlighted in the library — so when you press A in the game, you’re actually telling the library to launch that game again. It can look like a crash.
Nintendo DS games don’t do this, because the bottom screen is part of the game itself.
The fix is simple: if your game suddenly restarts, you’ve brushed the bottom screen. Tap the top screen to bring focus back up, and try to keep your thumbs clear of the lower display while you play. It becomes second nature after a session or two.
An SD card has failed
If you bought your RG DS from K-TEC, contact me through the contact form and I will replace or rewrite it under the Lifetime SD Card Guarantee.
Glossary
GammaOS Next
The custom operating system running on your RG DS. Built on Android 14 by TheGammaSqueeze, it is specifically designed for retro gaming handhelds — debloated, performance-optimized, and featuring the Daijishou launcher, performance modes, and dual-screen support.
Daijishou
The visual front-end on your RG DS. It displays your game platforms and games with box art and descriptions, letting you browse and launch games with touch or button controls. You see it on the bottom screen when not playing a Nintendo DS game.
RetroArch
RetroArch provides most of the emulators (called “cores”) that run your games. Most platforms on the RG DS run through RetroArch. The exceptions — Nintendo DS, Dreamcast, N64, and PSP — use standalone emulators.
Core
A core is an emulator that has been adapted to work within RetroArch. Each gaming platform uses a specific core chosen and configured for the best performance on the RG DS’s processor.
Emulator
Using an emulator, your device pretends that it is a different machine. For instance, using the DraStic emulator, your RG DS pretends that it is a Nintendo DS. It can then run games designed for that system. Some systems are more difficult to emulate than others — Nintendo 64 and Dreamcast require significantly more processing power than NES or SNES.
Save state
A snapshot of your game at an exact moment. For RetroArch platforms, your RG DS automatically creates a save state when you exit a game and loads it when you return.
GAMES-64GB / GAMES-128GB
The partition on your MicroSD card where your game files are stored. It uses the exFAT file system so it can be read by Windows, Mac, and Linux computers.
Didn’t Buy From K-TEC?
If you found this guide useful but your RG DS doesn’t have the features described here — the per-game keyboard mappings, the pre-configured arcade controls, the display optimizations, the Lifetime SD Card Guarantee — that’s because those come exclusively from buying a K-TEC-configured device.
Every RG DS from K-TEC is personally configured, tested, and shipped with a Kioxia MicroSD card and full UK-based support. If you’re thinking about your next handheld — or if you know someone who would appreciate a device that works the moment they open the box — take a look at what K-TEC offers.
Contact
If you need help with your RG DS from K-TEC, please use the contact form.
For SD card issues, see the Lifetime SD Card Guarantee.